Drawer React Navigation 3.x – react native: In this post we are going to learn about drawer navigation of React Navigation 3.x with one example,, but before going to detail of this article I suggest you to read the official documentation of React navigation 3.x as follow:
Drawer React Navigation 3.x – react native
In the below example we are going to learn basics of drawer and how to implement it in our application.
Installation :
First create a react native project by following command :
react-native init MyProject
Install the react-navigation package in your React Native project.
cd MyProject
npm install --save react-navigation

# or with yarn
# yarn add react-navigation
install react-native-gesture-handler :
npm install --save react-native-gesture-handler

# or with yarn
# yarn add react-native-gesture-handler
Link all native dependencies:
react-native link
After all this my project’s package.json file is as follow:
{
  "name": "MyProject",
  "version": "0.0.1",
  "private": true,
  "scripts": {
      "start": "node node_modules/react-native/local-cli/cli.js start",
      "test": "jest"
   },
   "dependencies": {
   "react": "16.6.1",
   "react-native": "0.57.7",
   "react-native-gesture-handler": "^1.0.10",
   "react-navigation": "^3.0.5"
  },
  "devDependencies": {
  "babel-jest": "23.6.0",
  "jest": "23.6.0",
  "metro-react-native-babel-preset": "0.50.0",
  "react-test-renderer": "16.6.1"
  },
 "jest": {
   "preset": "react-native"
  }
}
In our Project we are having two java script file as follow:
- index.js
- App.js
index.js :
import {AppRegistry} from 'react-native';
import App from './App';
import {name as appName} from './app.json';

AppRegistry.registerComponent(appName, () => App);
App.js :
import React, { Component } from 'react';
import { View } from 'react-native';
import { createDrawerNavigator,createAppContainer } from 'react-navigation'
import { Button,Container,Header,Left,Right,Icon,Text } from 'native-base';

class MyHomeScreen extends React.Component {
  render() {
    return (
      <Container>
        <Header>
          <Left style={{ flexDirection: 'row'}}>
           <Icon onPress={() => this.props.navigation.openDrawer()} name="md-menu" style={{ color: 'white', marginRight: 15 }} />
          </Left>
          <Right>
           <Icon name="md-cart" style={{ color: 'white' }} />
          </Right>
        </Header>
       <View style={{ marginTop:100,marginLeft:100}}>
         <Button onPress={() => this.props.navigation.navigate('Notifications')} >
           <Text>Go to notifications</Text>
         </Button>
        </View>
       </Container>
     );
   }
 }// End of MyHomeScreen class

class MyNotificationsScreen extends React.Component {
   render() {
     return (
       <View style={{ marginTop:100,marginLeft:100}}>
         <Button onPress={() => this.props.navigation.goBack()} >
           <Text>Go back home</Text>
         </Button>
       </View>
     );
    }
}//End of MyNotificationsScreen class

const MyDrawerNavigator = createDrawerNavigator({
   Home:{
      screen: MyHomeScreen,
   },
   Notifications: {
      screen: MyNotificationsScreen,
   },
 });

const MyApp = createAppContainer(MyDrawerNavigator);

class App extends React.Component{
    render(){
      return(
        <Container>
          <MyApp >
            </MyApp >
        </Container>
      );
    }
}//End of App class

export default App;
In above code of App.js file we have used component of native base ,and therefore we will install native base as follow :
Install NativeBase
npm install native-base --save
Install Peer Dependencies
react-native link
Explaination of App.js :
In this file App.js, we have define three class namely as follow:
- MyHomeScreen
- MyNotificationsScreen
- App
and two constants as follow:
- MyDrawerNavigator
- MyApp
We are creating two screen with the help of two class MyHomeScreen and MyNotificationsScreen
class MyHomeScreen :
class MyHomeScreen extends React.Component {
  render() {
    return (
      <Container>
       <Header>
        <Left style={{ flexDirection: 'row' }}>
         <Icon onPress={() => this.props.navigation.openDrawer()} name="md-menu" style={{ color: 'white', marginRight: 15 }} />
        </Left>
        <Right>
         <Icon name="md-cart" style={{ color: 'white' }} />
        </Right>
       </Header>
       <View style={{ marginTop:100,marginLeft:100}}>
        <Button onPress={() => this.props.navigation.navigate('Notifications')} >
         <Text>Go to notifications</Text>
        </Button>
       </View>
      </Container>
    );
  }
}// End of MyHomeScreen class
Explaination of MyHomeScreen class :
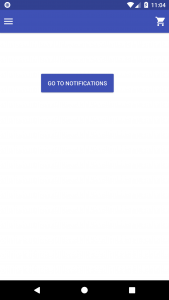
In this class we are creating header of screen ,on left side of header we are creating Icon of “md-menu”,and onPress of this Icon we have open the drawer with the help of this code :
onPress={() => this.props.navigation.openDrawer()}In this home screen one button is also given ,on press of this button MyNotificationsScreen is called with following code :
onPress={() => this.props.navigation.navigate('Notifications')}
class MyNotificationsScreen :
class MyNotificationsScreen extends React.Component {
  render() {
   return (
     <View style={{ marginTop:100,marginLeft:100}}>
      <Button onPress={() => this.props.navigation.goBack()} >
       <Text>Go back home</Text>
      </Button>
     </View>
   );
  }
}//End of MyNotificationsScreen class
Explaination of MyNotificationsScreen class :
In this class we are creating a button ,and on press of this button we are going back to home screen from this notification screen ,for this we are using following code:
onPress={() => this.props.navigation.goBack()}Constant MyDrawerNavigator :
const MyDrawerNavigator = createDrawerNavigator({
   Home: {
      screen: MyHomeScreen,
   },
   Notifications: {
      screen: MyNotificationsScreen,
   },
});
Constant MyApp :
const MyApp = createAppContainer(MyDrawerNavigator);
Class App :
class App extends React.Component{
  render(){
    return(
      <Container>
        <MyApp />
      </Container>
    );
  }
}
Explaination of App class:
In this class we are using <MyApp /> tag .
When you will run the above code, following output will come

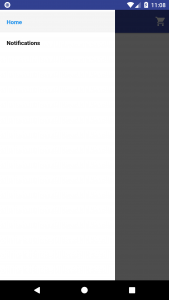
On Left side of Header we are having menu ,on press of this drawer will be open as follow:

If you face any problem during implementing this tutorial, please let us know. Feel free to comment in given comment box.
You might be interested React Native Geolocation
