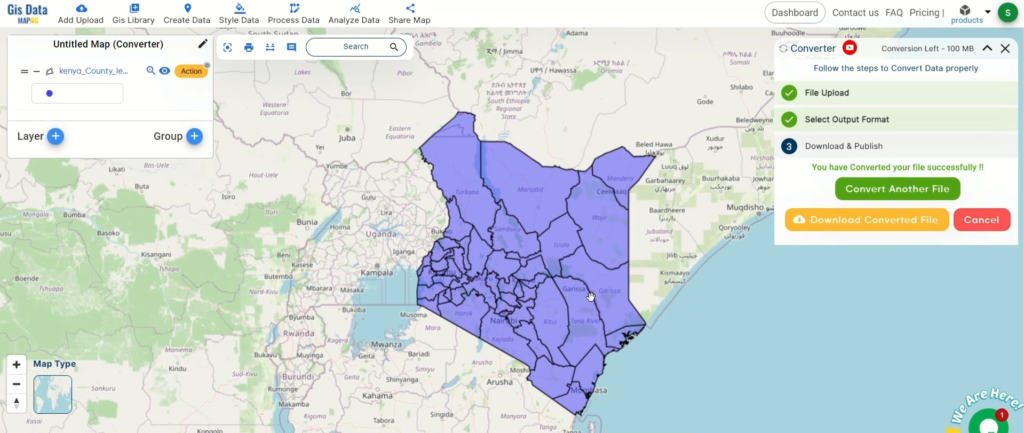
Effortlessly convert KML to SHP with MAPOG to streamline your geographic data transformation for enhanced spatial analysis and interoperability.
Transforming your GIS data by converting KML to SHP can simplify analysis, sharing, and integration into various GIS applications. Whether you’re a beginner or an experienced user, this tutorial will guide you through the process in easy steps.
KEY CONCEPT OF CONVERTING FILES
The Converter Tool in MAPOG Map Analysis allows you to change your data from one format to another effortlessly. You input your data in one form, and it transforms it into the required format for your analysis. This versatility enables you to download and use data in various formats, making it adaptable for different applications.
STEPS TO CONVERT KML TO SHP WITH MAPOG
STEP 1: UPLOAD THE DATA
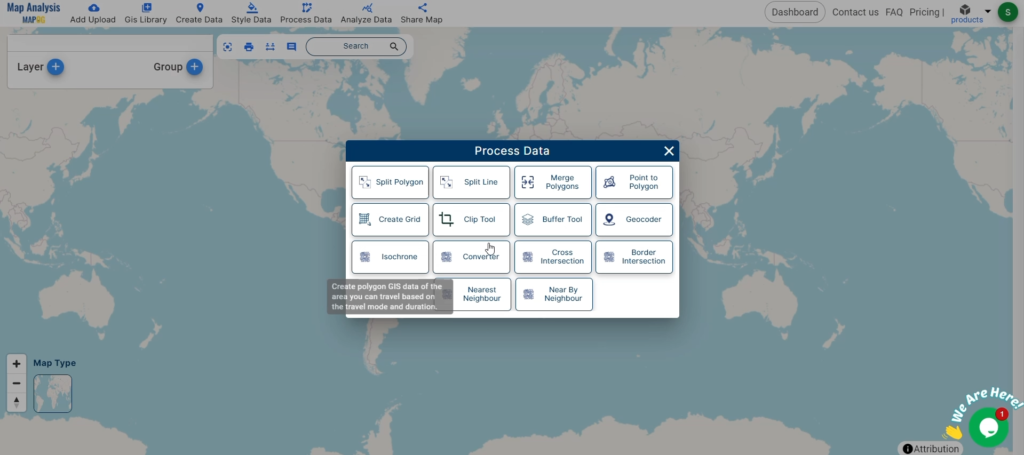
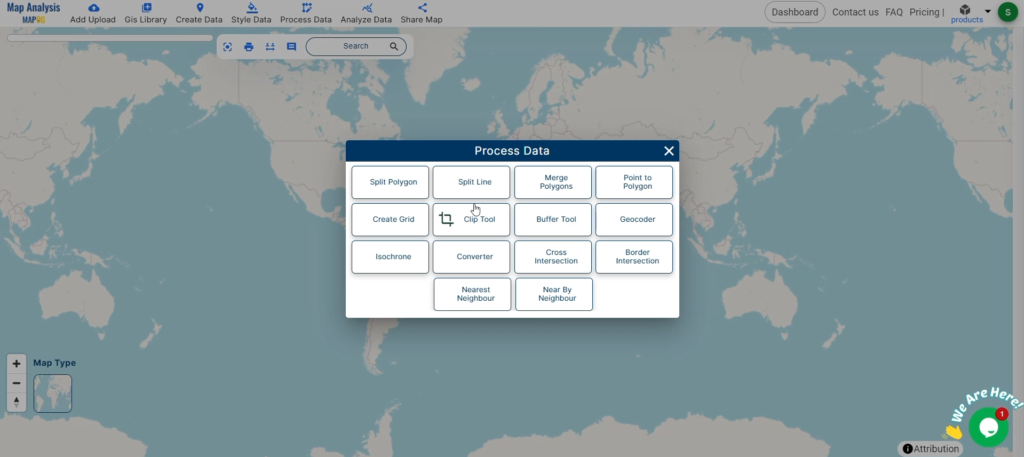
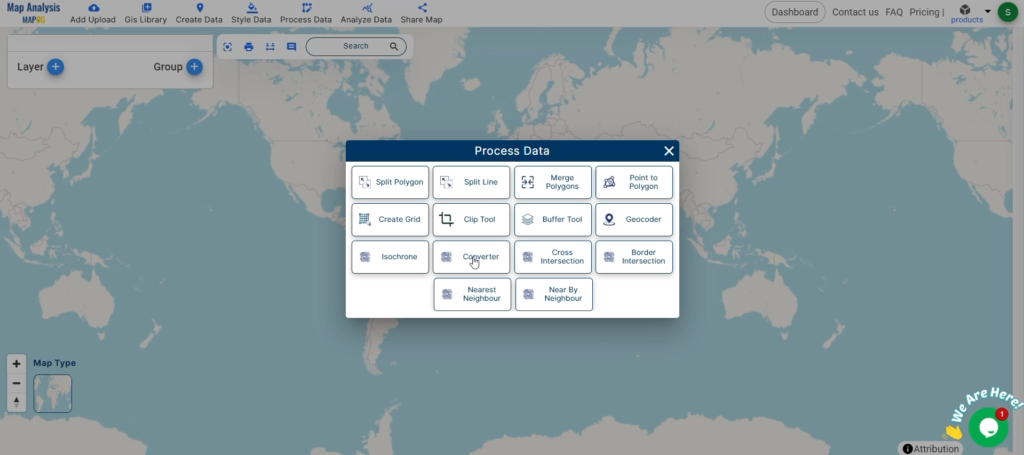
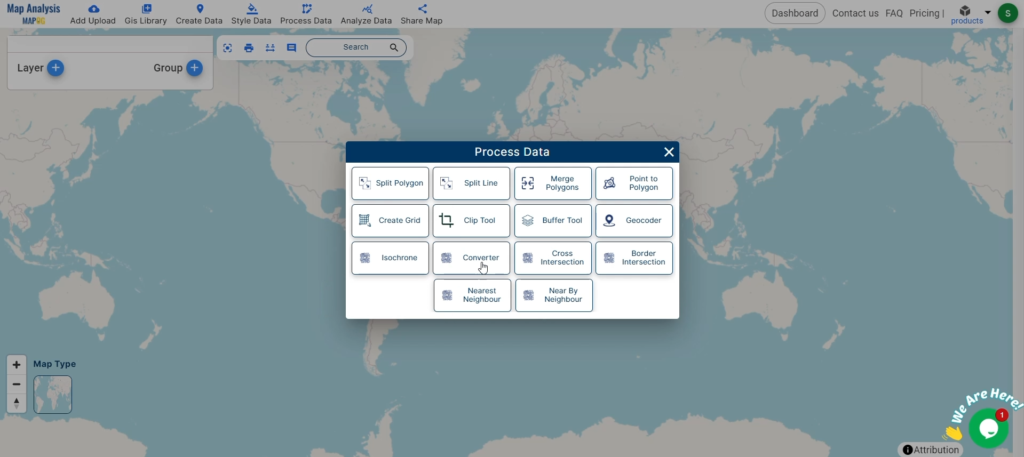
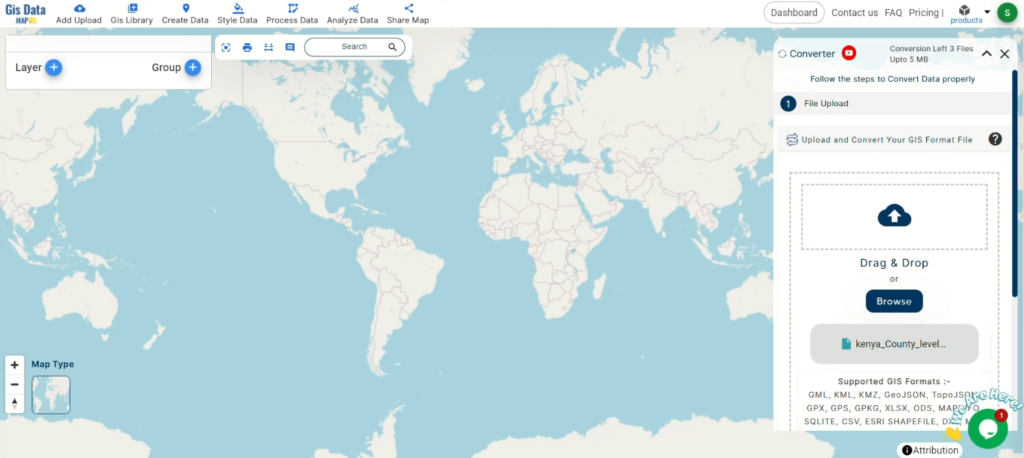
Access the Converter Tool: Click on the “Process Data” menu and choose the “Converter Tool” option.
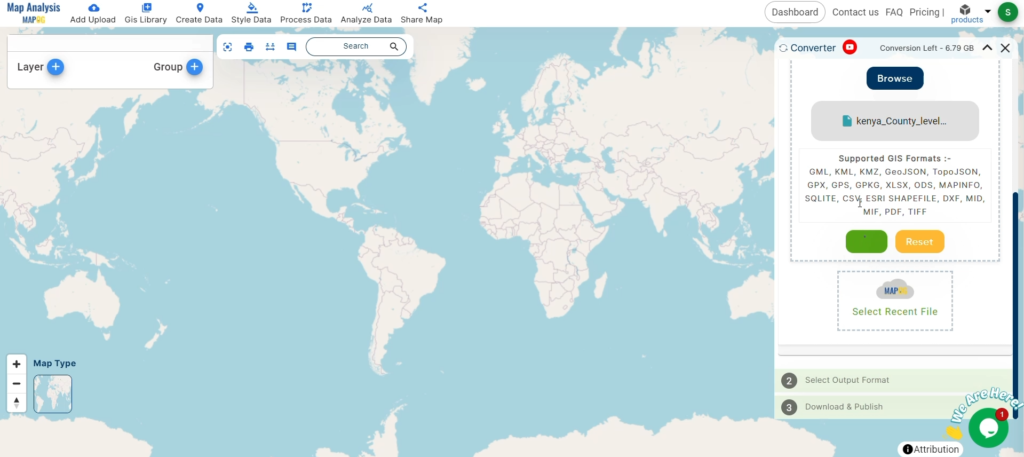
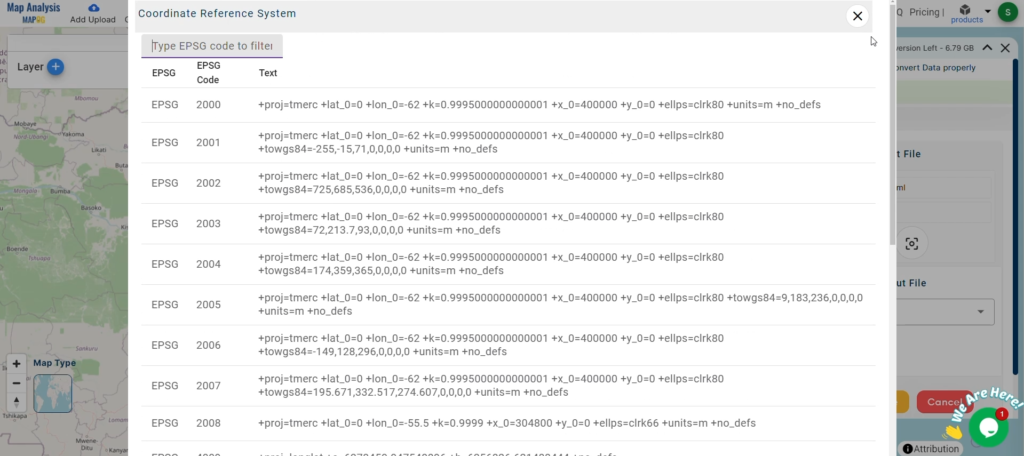
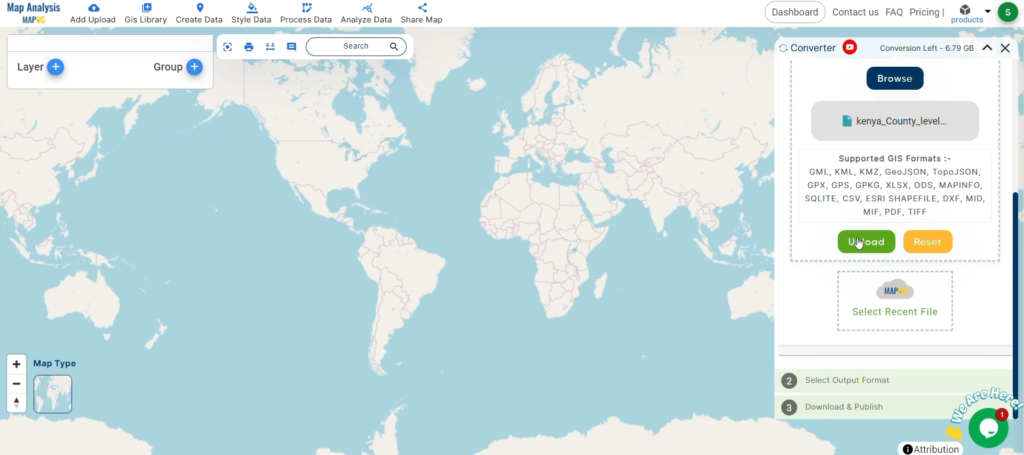
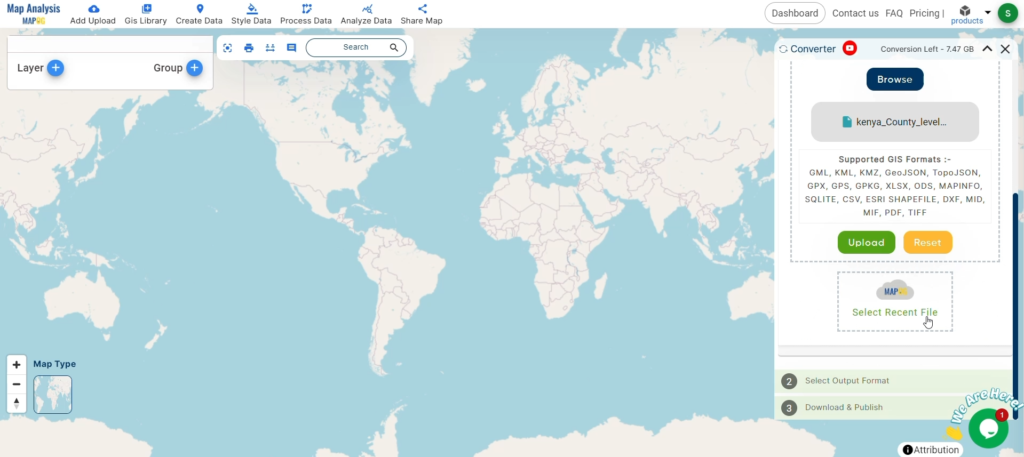
Upload KML File: This is your starting point where you provide the data that needs conversion.
STEP 2: SELECT THE FORMAT FOR CONVERSION
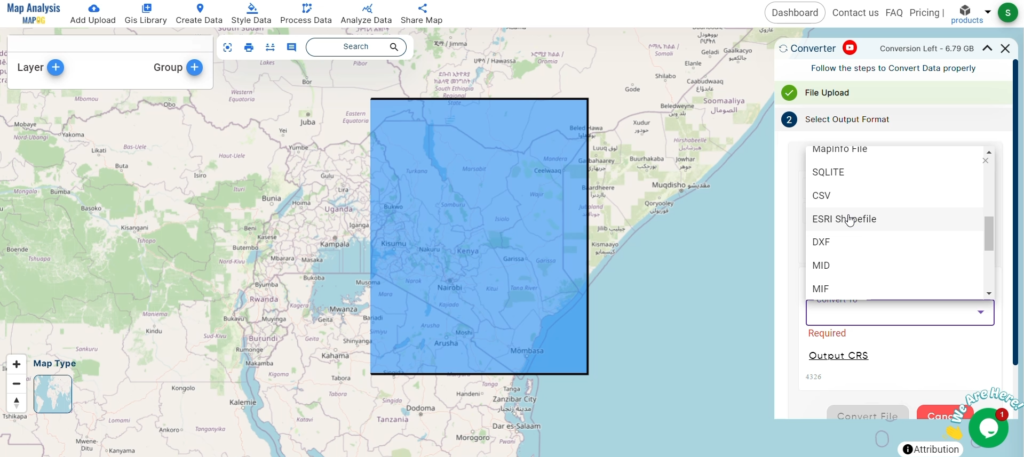
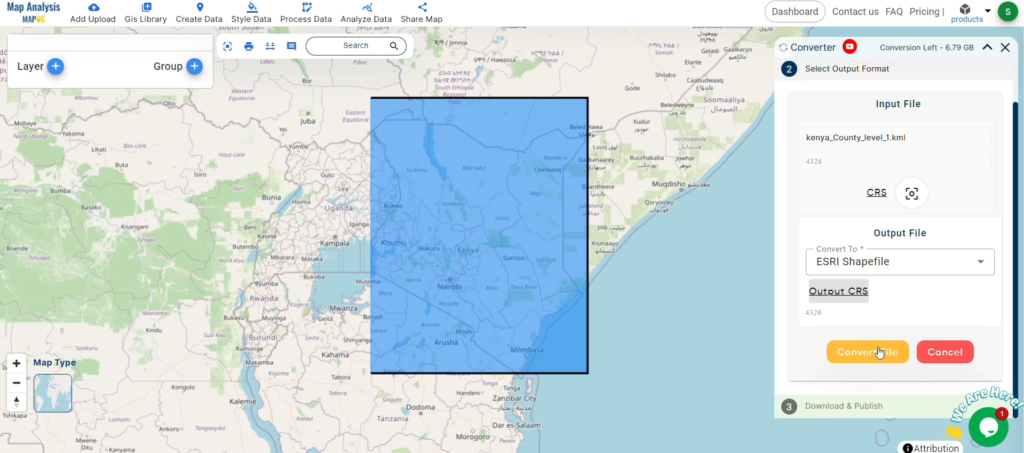
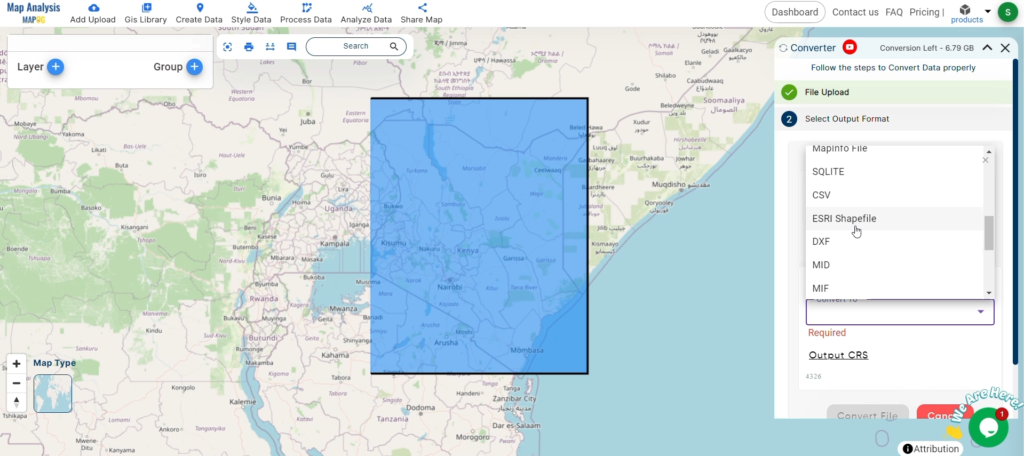
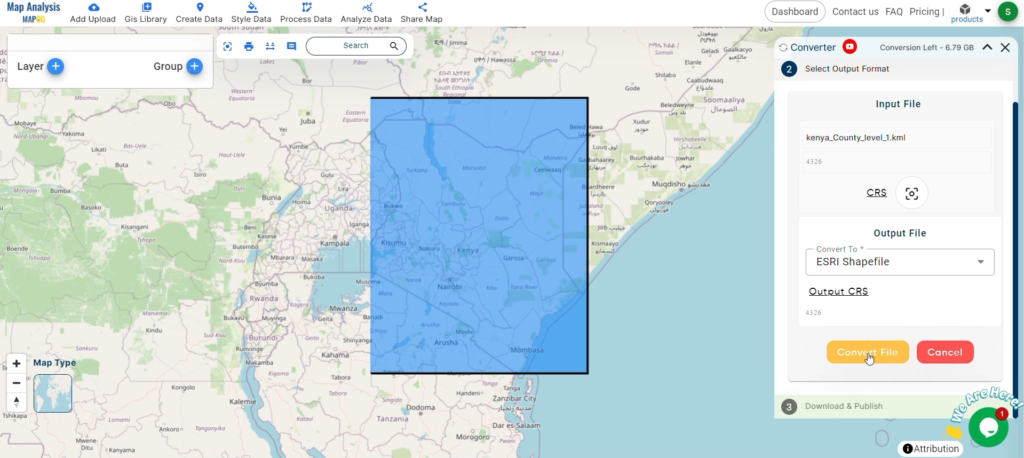
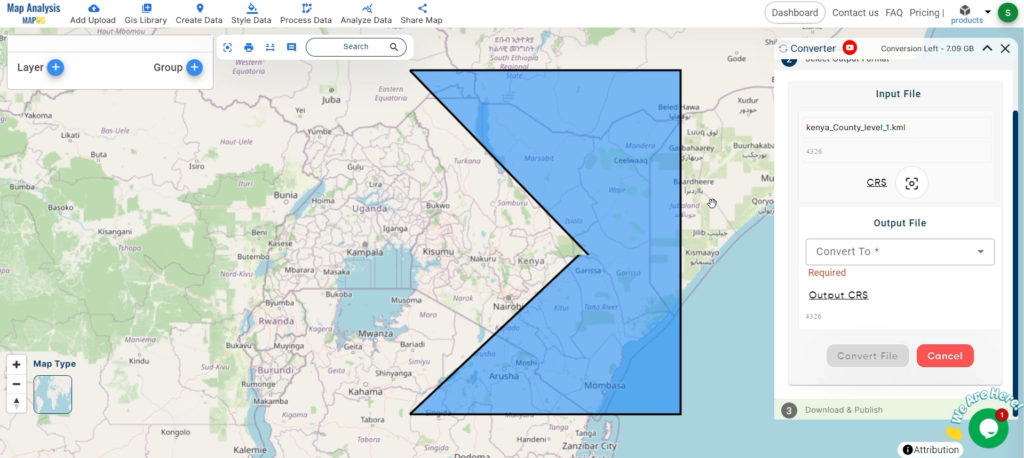
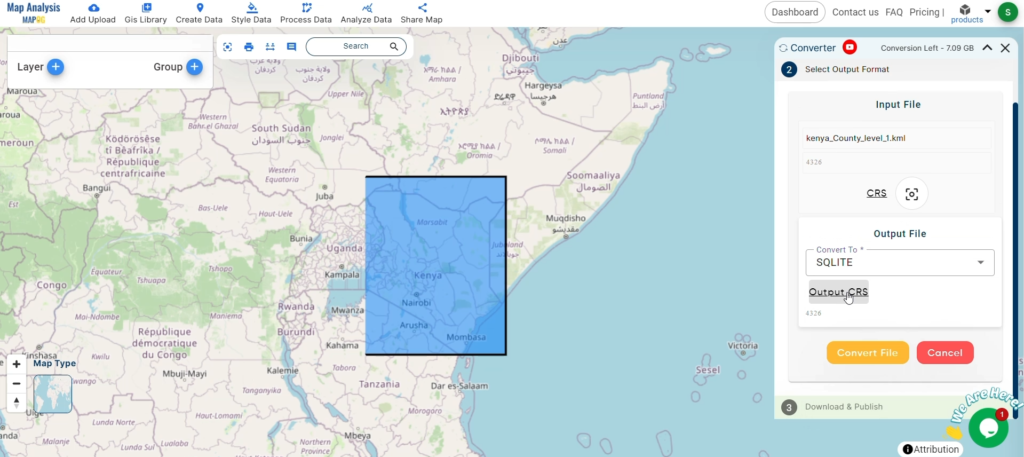
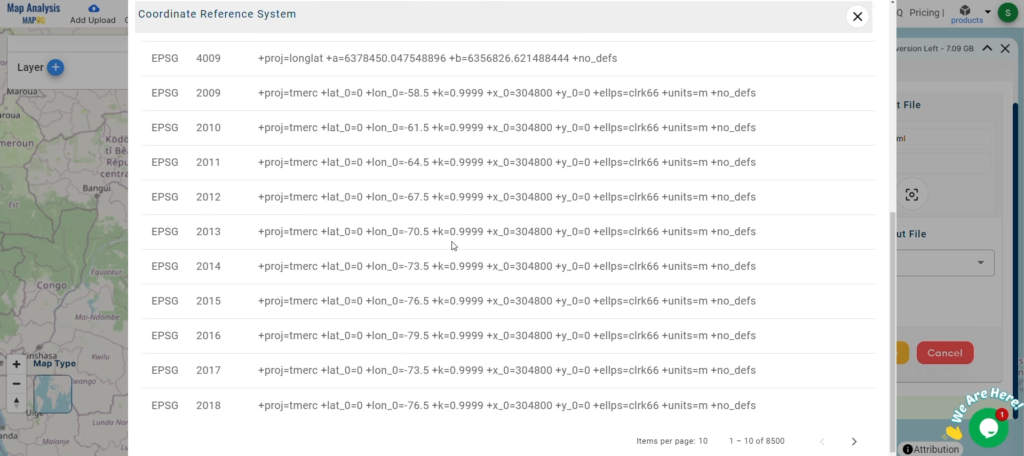
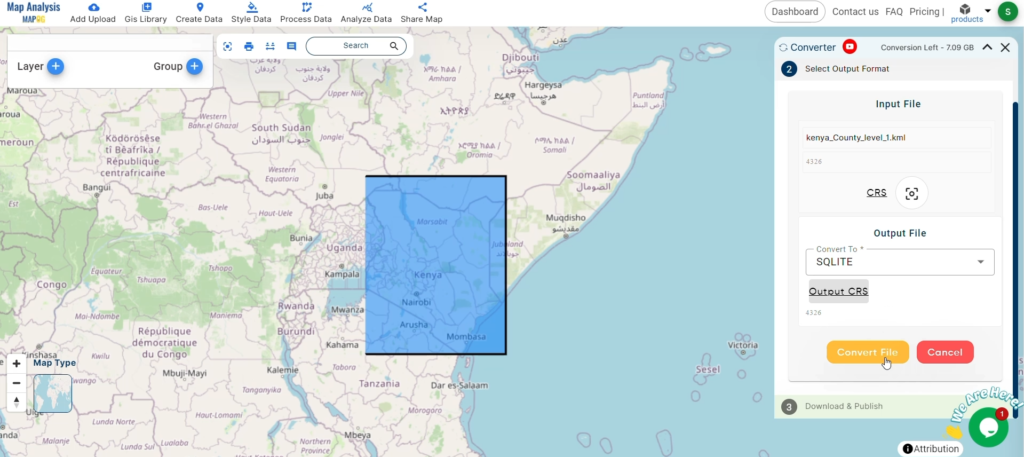
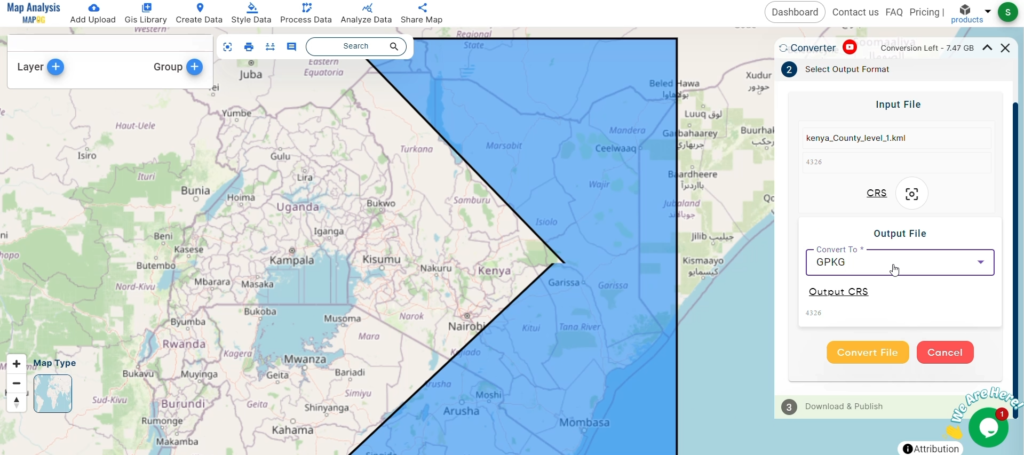
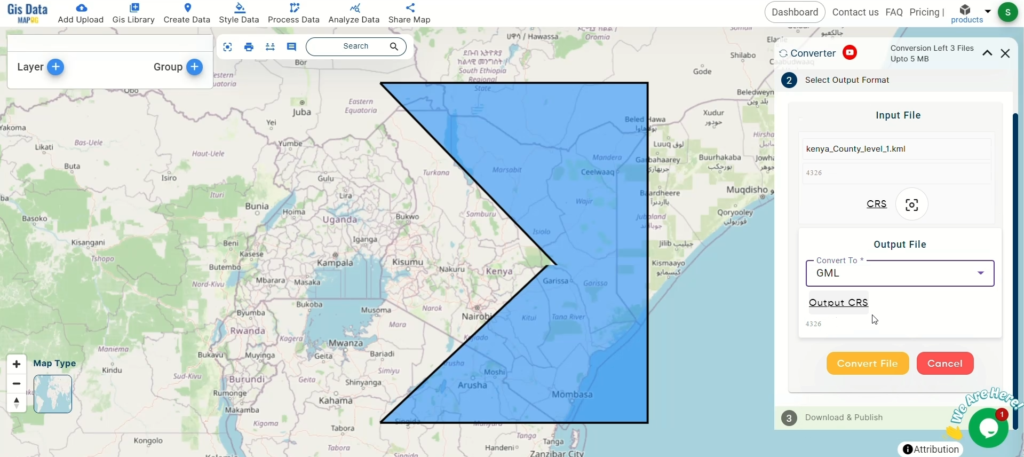
Choose the Output File Format: Select SHP as the output file format. The tool offers various formats, but for this guide, we focus on converting to SHP.
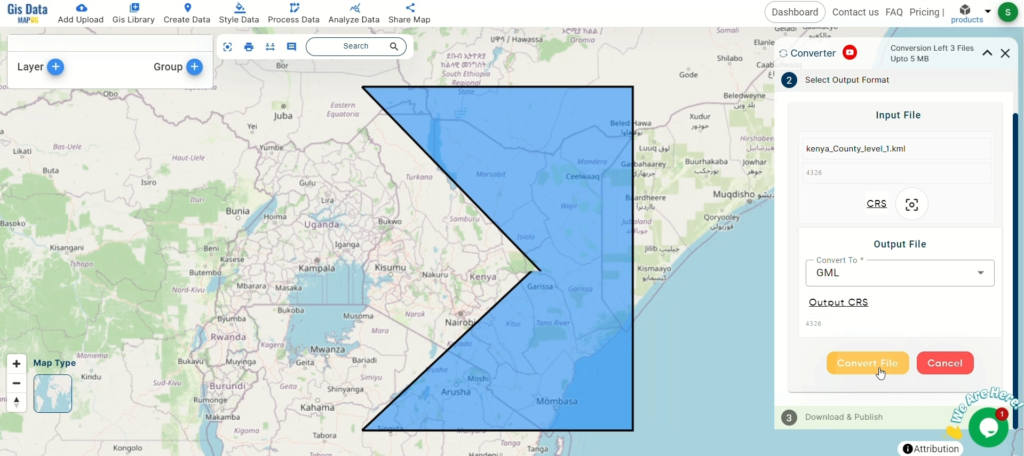
Start the Conversion Process: Click ‘Convert’ and let the tool work its magic. The Converter Tool processes your data, transforming it from KML to SHP format.
STEP 4: REVIEW AND DOWNLOAD
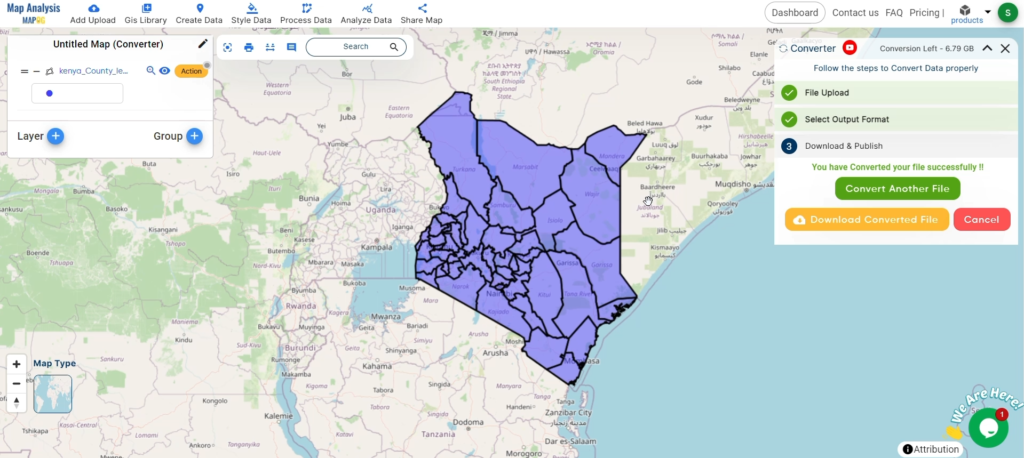
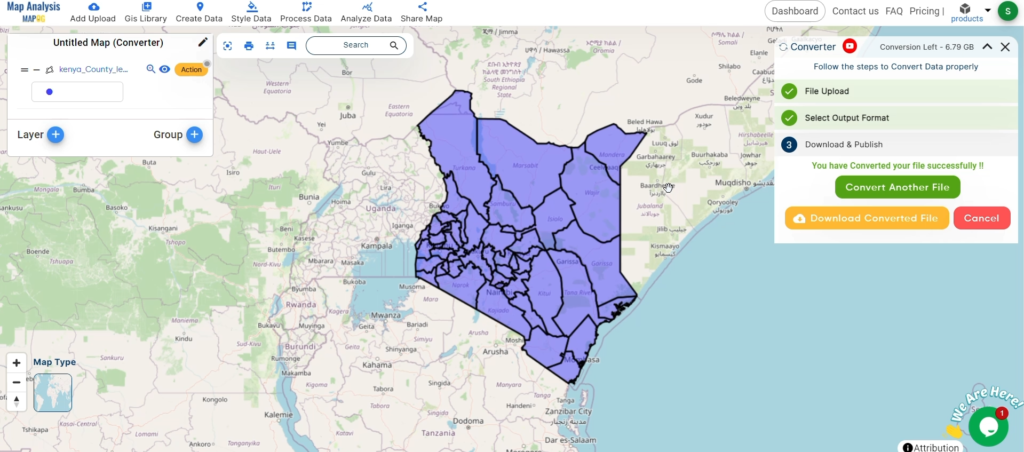
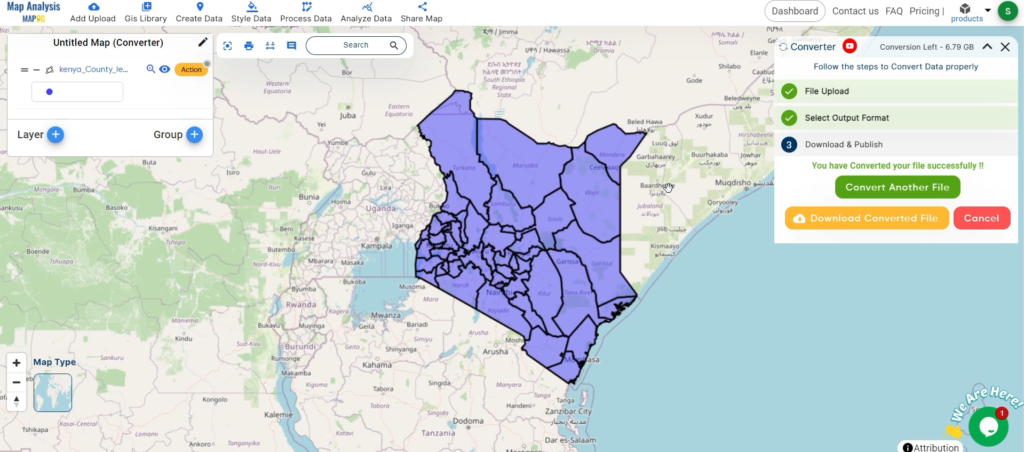
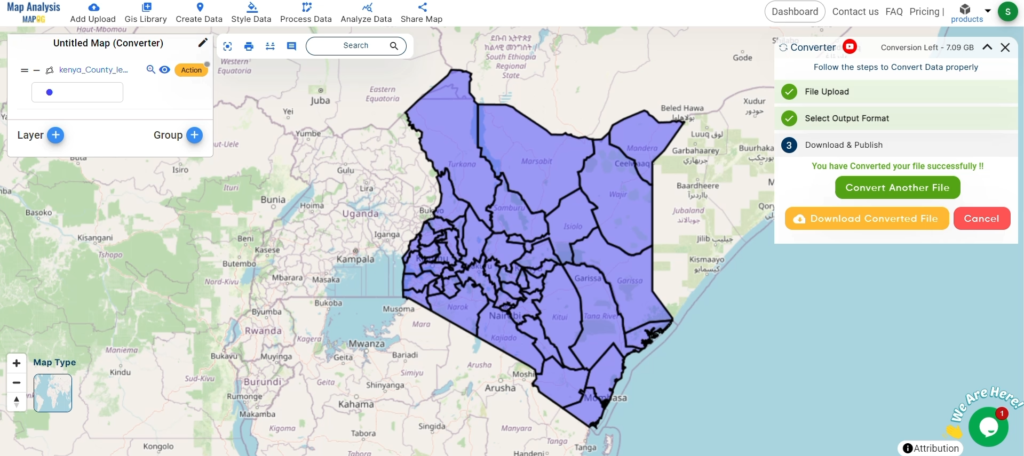
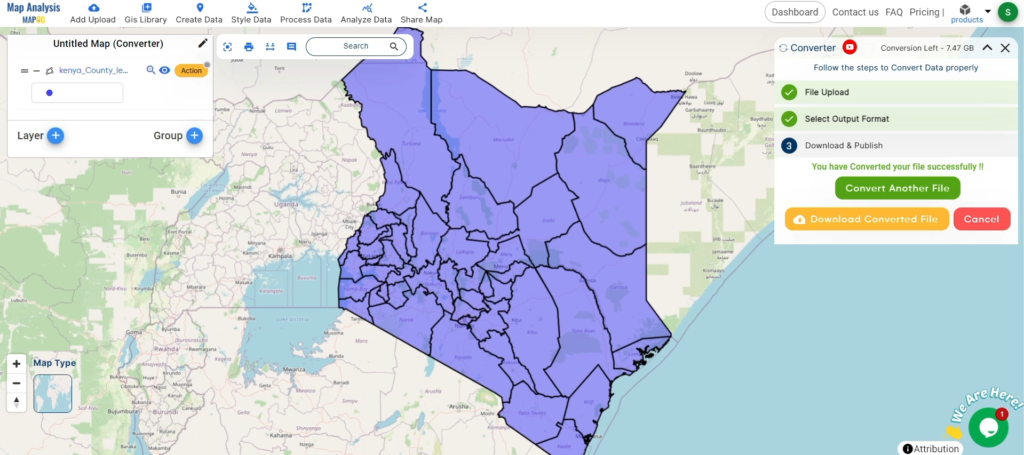
Review the Converted Data: Check your converted SHP data to ensure it looks correct. This step is crucial to verify that the conversion has been successful and the data integrity is maintained.
And there you have it! You’ve successfully used the Converter Tool in MAPOG Map Analysis to convert your KML files to SHP. This conversion simplifies the process of handling different data formats and makes your workflow more efficient and effective. For any queries, please contact us at support@mapog.com.
Download railway data in Shapefile, KML, GeoJSON, and 15+ other GIS formats. Access comprehensive datasets for enhanced mapping and spatial analysis.
Accessing accurate and up-to-date railway data is essential for GIS professionals, urban planners, and researchers. Whether you’re working on transportation analysis, infrastructure planning, or mapping projects, having railway data in the right format can significantly enhance your work. In this article, we will guide you through the process of downloading railway data in multiple GIS formats, including Shapefile, KML, GeoJSON, and over 15 other formats. We will be utilizing the MAPOG GIS DATA platform, a versatile tool that simplifies the process of acquiring and converting GIS data to meet your specific needs.
We offer an extensive array of data formats, including KML, SHP, CSV, GeoJSON, Tab, SQL, Tiff, GML, KMZ, GPKZ, SQLITE, Dxf, MIF, TOPOJSON, XLSX, GPX, ODS, MID, and GPS, ensuring compatibility and accessibility for various applications and analyses.
Steps to Download Railway Data
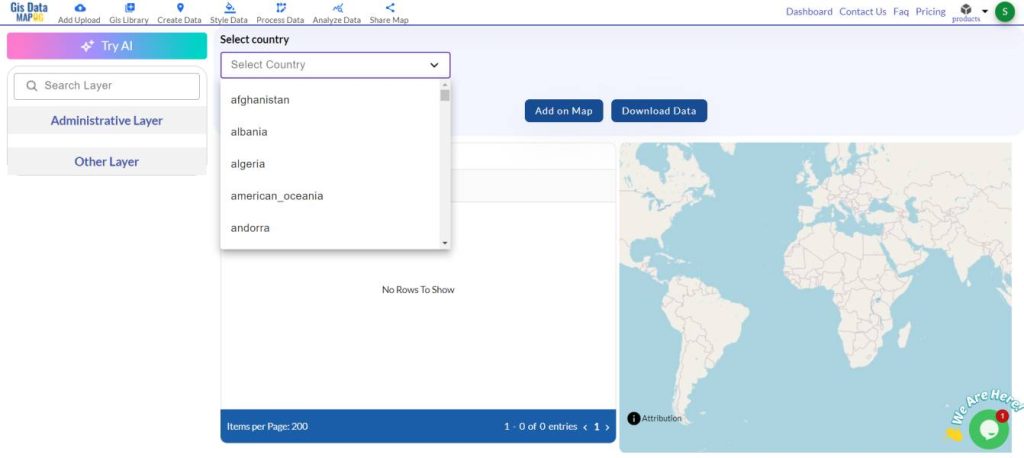
Step 1: Open MAPOG GISDATA Tool and Search for the Country
Begin by opening the MAPOG GISDATA platform. Once you’re on the platform, use the search bar to enter the name of the country whose railway data you wish to download. This will help you quickly locate the relevant geographic data specific to the country’s railway network.
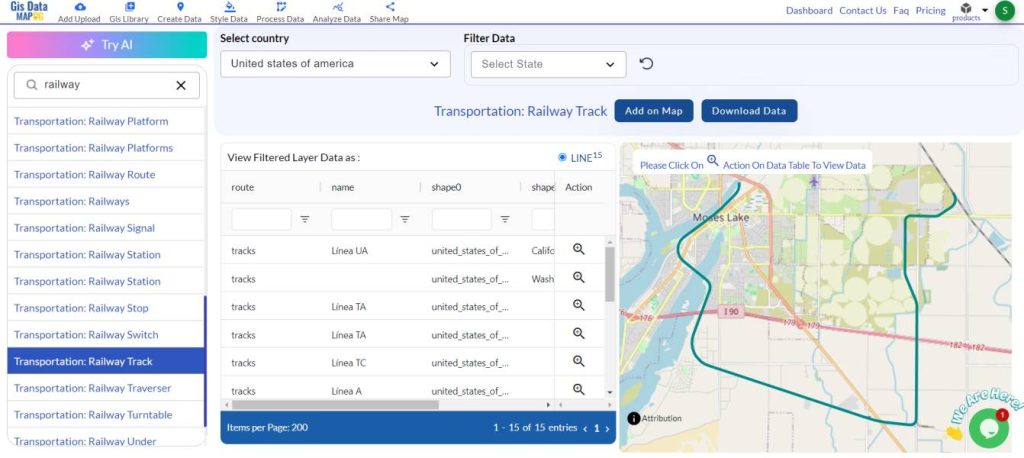
Step 2: Search for ‘RailData’ in the Search Bar
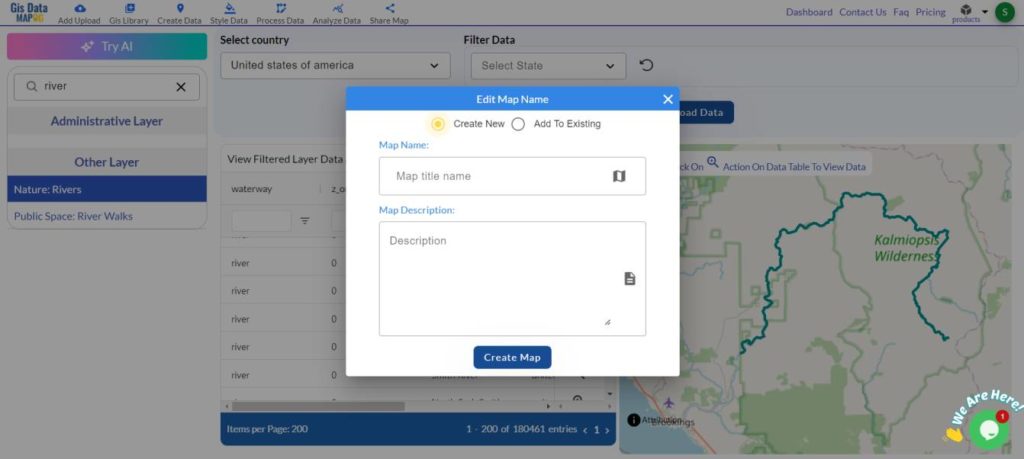
In the search bar of the MAPOG GISDATA platform, type “Railway.” This will generate a list of different types of railway data available for download, including railway networks, platforms, railway crossings, bridges, and more. Select the specific type of data you need for your project.
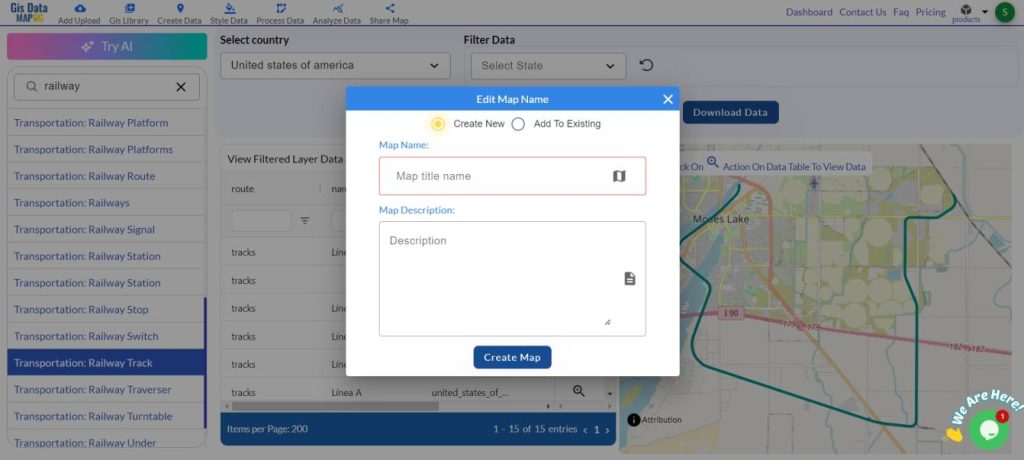
Step 3: Add to Map for Visual Analysis
Once you’ve selected the railway data, click “Add to Map” to visualize it directly on the map. This allows you to see the spatial arrangement of the railway data and zoom in to explore specific features in detail.
Step 4: Download the Data
After confirming that the data is what you need, click the “Download” button. Choose your preferred format—whether it’s Shapefile, KML, GeoJSON, or any other available format—to save the data for your project.
Conclusion
Accessing and utilizing railway data is crucial for various GIS-related projects, and the MAPOG GISDATA platform makes this process straightforward and efficient. By following the steps outlined in this guide, you can easily download railway data in the format that best suits your needs. Whether you’re working on transportation analysis, infrastructure planning, or any other mapping project, MAPOG ensures you have the right tools at your fingertips.
For any questions or further assistance, feel free to reach out to us at support@mapog.com. We’re here to help you make the most of your GIS data.
Disclaimer: The GIS data provided for download in this article was initially sourced from OpenStreetMap (OSM) and further modified to enhance its usability. Please note that the original data is licensed under the Open Database License (ODbL) by the OpenStreetMap contributors. While modifications have been made to improve the data, any use, redistribution, or modification of this data must comply with the ODbL license terms. For more information on the ODbL, please visit OpenStreetMap’s License Page.
Disclaimer : If you find any shapefile data of country provided is incorrect do contact us or comment below, so that we will correct the same in our system as well we will try to correct the same in openstreetmap.
Easily transform your KML data into CSV format using MAPOG, simplifying your geographic data processing for improved spatial analysis.
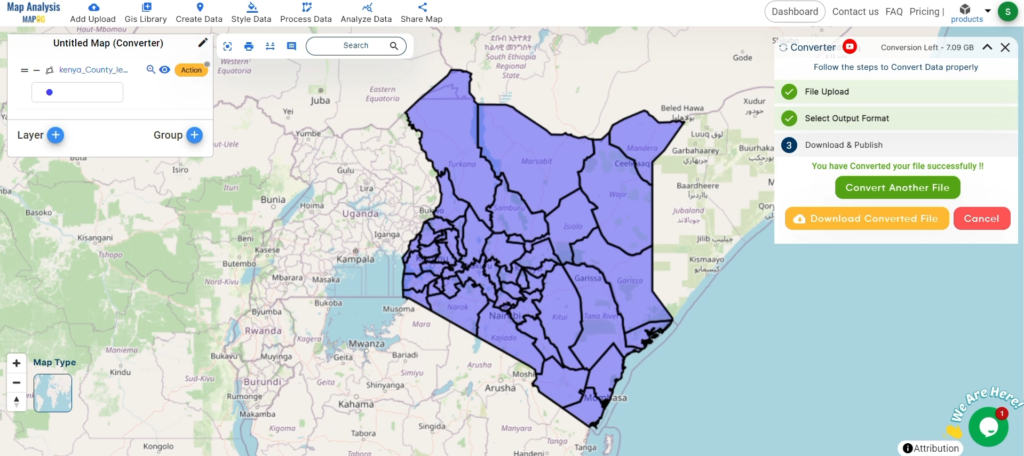
Converting KML data to CSV offers a straightforward approach to analyze, share, and integrate geographical information across various platforms. Whether you’re new to the process or experienced, this guide will walk you through the steps seamlessly.
Converting KML to CSV with MAPOG
Key Concept of File Conversion MAPOG’s Converter Tool facilitates effortless transformation between different data formats. By inputting data in one format, the tool converts it into the required format for analysis, enhancing flexibility and adaptability across applications.
Steps to Convert KML to CSV with MAPOG
Step 1: Upload the Data
Access the Converter Tool: Navigate to the “Process Data” menu and select “Converter Tool.”
Upload KML File: Begin by uploading the KML file you wish to convert.
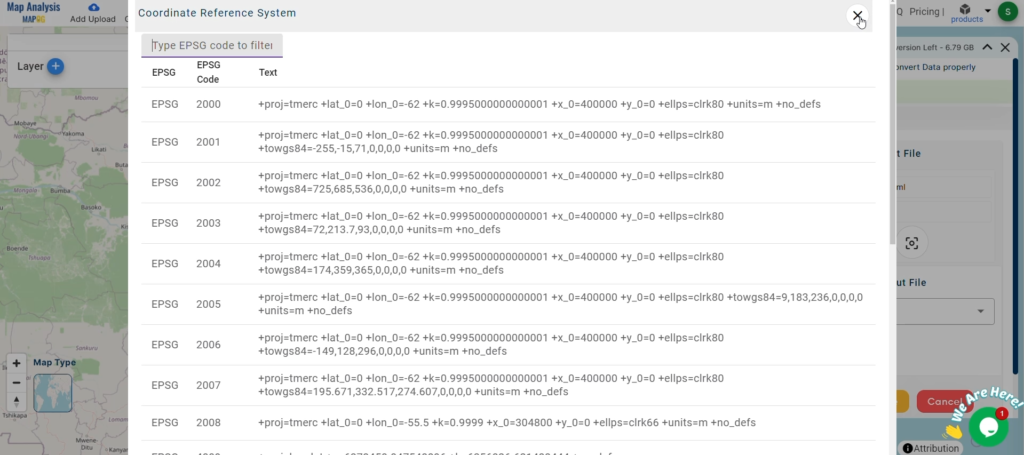
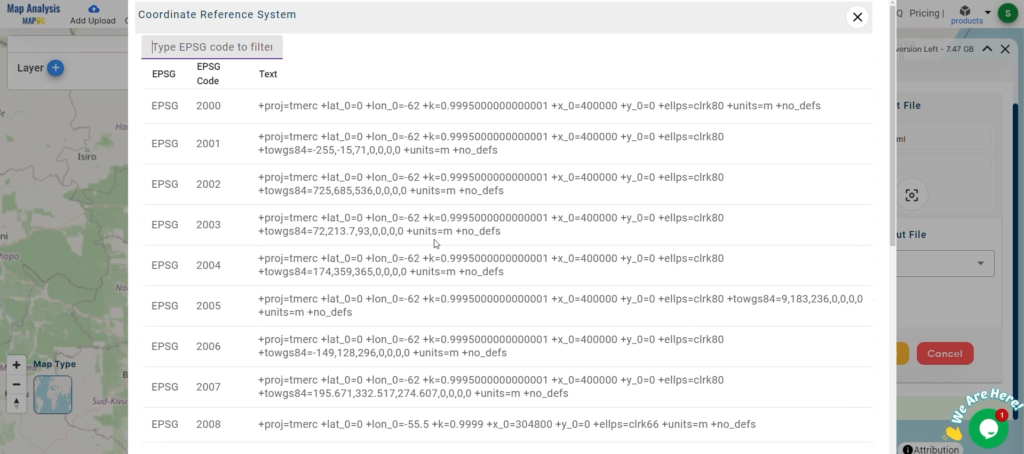
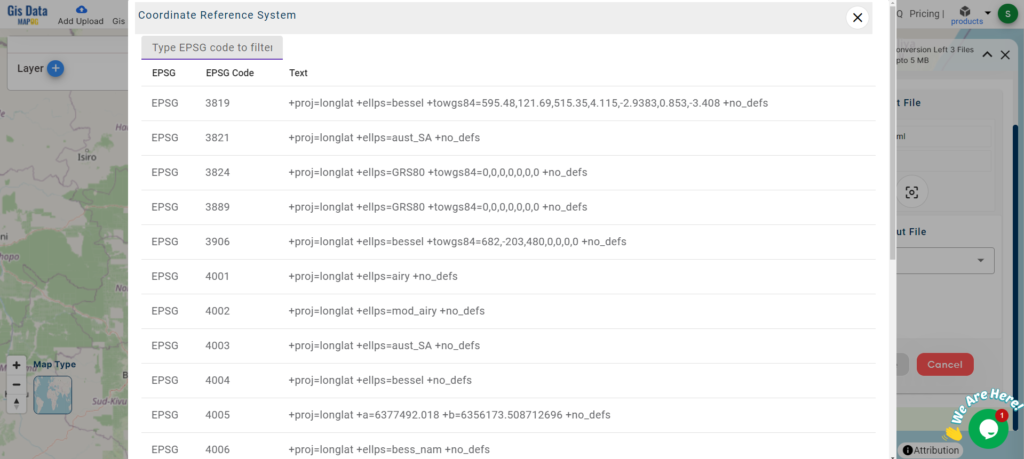
Set the CRS (Coordinate Reference System): Optionally, set the CRS to align data accurately with spatial analysis requirements.
Step 3: Run the Conversion
Initiate the Conversion Process: Click on ‘Convert‘ to start the conversion process.
Step 4: Review and Download
Review the Converted Data: Verify the converted CSV data for accuracy.
Download the Converted File: Upon satisfaction, download the converted CSV file.
Conclusion
By utilizing MAPOG’s Converter Tool, you’ve efficiently converted your KML files to CSV, streamlining your workflow and enhancing data interoperability. For further assistance, feel free to reach out to us at support@mapog.com.
Effortlessly convert KML to SQLite with MAPOG to streamline your geographic data transformation for enhanced spatial analysis and interoperability.
Transforming your GIS data by converting KML to SQLite can simplify analysis, sharing, and integration into various GIS applications. Whether you’re a beginner or an experienced user, this tutorial will guide you through the process in easy steps.
Key Concept of Converting Files
The Converter Tool in MAPOG Map Analysis allows you to change your data from one format to another effortlessly. You input your data in one form, and it transforms it into the required format for your analysis. This versatility enables you to download and use data in various formats, making it adaptable for different applications.
Steps to Convert KML to SQLite with MAPOG
Step 1: Upload the Data
Access the Converter Tool: Click on the “Process Data” menu and choose the “Converter Tool” option.
Upload KML File: This is your starting point where you provide the data that needs conversion.
Step 2: Select the Format for Conversion
Choose the Output File Format: Select SQLite as the output file format. The tool offers various formats, but for this guide, we focus on converting to SQLite.
Set the CRS (Coordinate Reference System): You can also set the CRS at this stage to ensure your data aligns correctly with your spatial analysis requirements.
Step 3: Run the Conversion
Start the Conversion Process: Click ‘Convert’ and let the tool work its magic. The Converter Tool processes your data, transforming it from KML to SQLite format.
Step 4: Review and Download
Review the Converted Data: Check your converted SQLite data to ensure it looks correct. This step is crucial to verify that the conversion has been successful and the data integrity is maintained.
Download the Converted File: Once satisfied, download the converted file.
Conclusion
And there you have it! You’ve successfully used the Converter Tool in MAPOG Map Analysis to convert your KML files to SQLite. This conversion simplifies the process of handling different data formats and makes your workflow more efficient and effective. For any queries, please contact us at support@mapog.com.
Convert KML to GPKG effortlessly with MAPOG. Streamline your geographic data transformation for enhanced spatial analysis and interoperability.
Transforming your GIS data by converting KML to GPKG can simplify analysis, sharing, and integration into various GIS applications. Whether you’re a beginner or an experienced user, this tutorial will help you understand the process in easy steps.
Key Concept of Converting GIS Data Files
The Converter Tool in MAPOG Map Analysis allows you to change your data from one format to another effortlessly. You input your data in one form, and it transforms it into the required format for your analysis. This versatility enables you to download and use data in various formats, making it adaptable for different applications.
Steps to Convert KML to GPKG with MAPOG
Step 1: Upload the Data
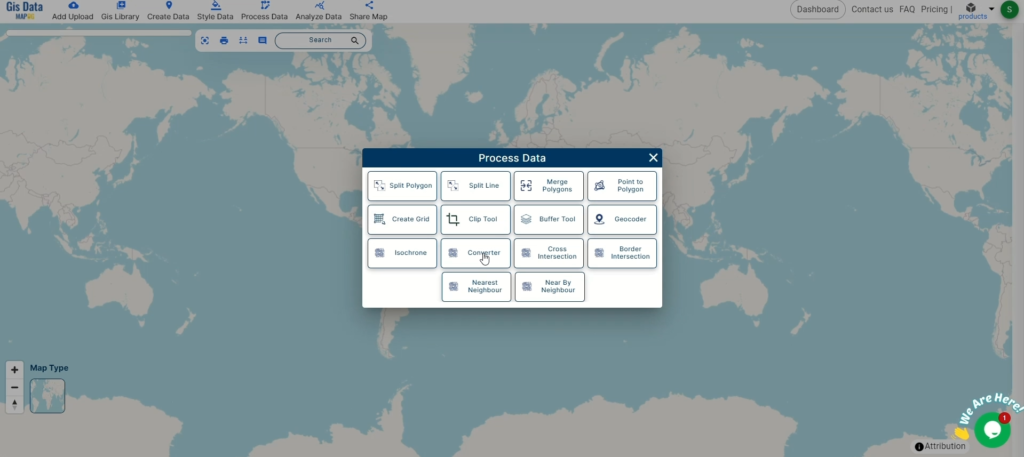
Access the Converter Tool: Click on the “Process Data” menu and choose the “Converter Tool” option.
Upload Your KML File: This is your starting point where you provide the data that needs conversion.
Step 2: Select the Format for Conversion
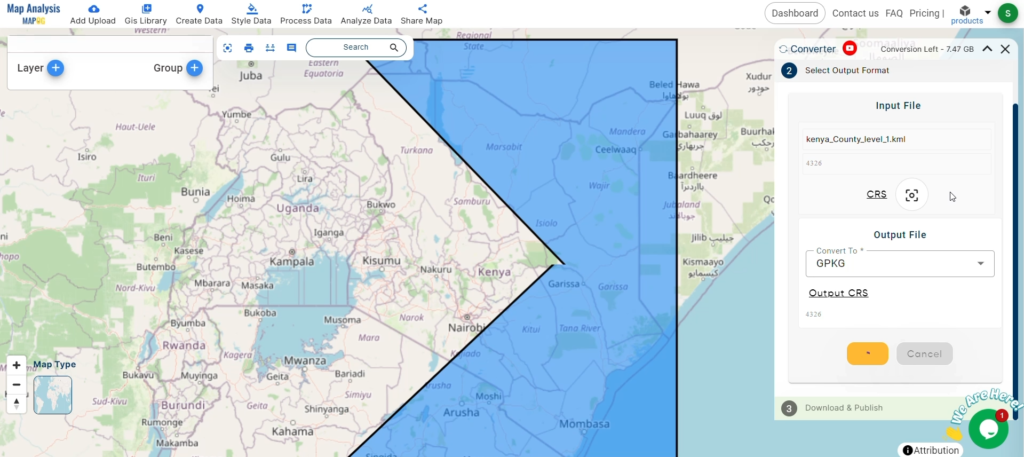
Choose the Output File Format: Select GPKG as the output file format. The tool offers various formats, but for this guide, we focus on converting to GPKG.
Start the Conversion Process: Click ‘Convert’ and let the tool work its magic. The Converter Tool processes your data, transforming it from KML to GPKG format.
Step 4: Review and Download
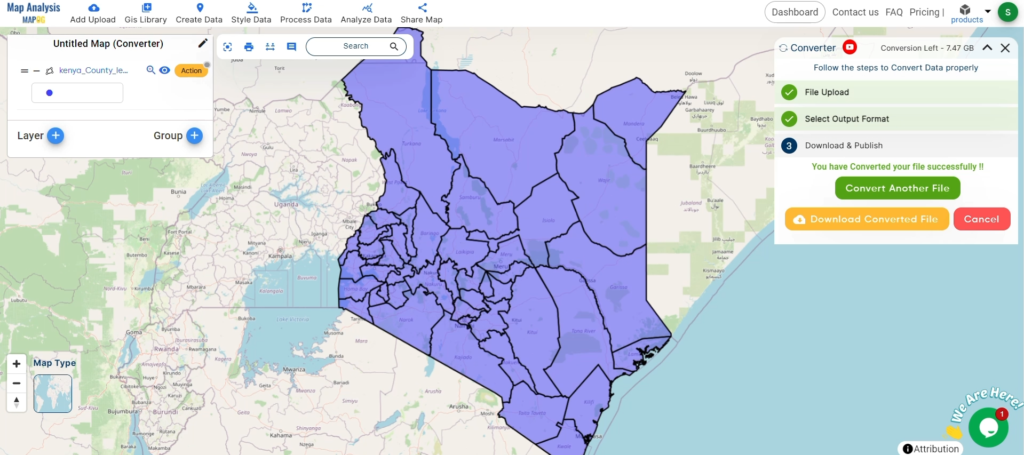
Review the Converted Data: Check your converted GPKG data to ensure it looks correct. This step is crucial to verify that the conversion has been successful and the data integrity is maintained.
Download the Converted File: Once satisfied, download the converted file.
Conclusion
And there you have it! You’ve successfully used the Converter Tool in MAPOG Map Analysis to convert your KML files to GPKG. This conversion simplifies the process of handling different data formats and makes your workflow more efficient and effective. For any queries, please contact us at support@mapog.com.
Here are some other blogs you might be interested in:
Convert KML to GML effortlessly with MAPOG. Streamline your geographic data transformation for enhanced spatial analysis and interoperability.
Transforming your GIS data by converting KML to GML can make it easier to analyze, share, and integrate into various GIS applications. In this guide, we’ll walk you through the process of efficiently converting your KML files to GML using the powerful Converter Tool in MAPOG Map Analysis. Whether you’re a beginner or an experienced user, this tutorial will help you understand the process in easy steps.
Key Concept of Converting Files
The Converter Tool in MAPOG Map Analysis helps you change your data from one format to another effortlessly. You input your data in one form, and it transforms it into another form that you need for your analysis. This versatility allows you to download and use data in various formats, making it adaptable for different applications.
Steps to Convert KML to GML GIS Data File
Step 1: Upload the Data
Access the Converter Tool: Click on the “Process Data” menu and choose the “Converter Tool” option.
Upload Your KML File: This is your starting point where you provide the data that needs conversion.
Step 2: Select the Format for Conversion
Choose the Output File Format: Select GML as the output file format. The tool offers various formats, but for this guide, we focus on converting to GML.
Set the CRS (Coordinate Reference System): You can also set the CRS at this stage to ensure your data aligns correctly with your spatial analysis requirements.
Step 3: Run the Conversion
Start the Conversion Process: Click ‘Convert’ and let the tool work its magic. The Converter Tool processes your data, transforming it from KML to GML format.
Step 4: Review and Download
Review the Converted Data: Check your converted GML data to ensure it looks right. This step is crucial to verify that the conversion has been successful and the data integrity is maintained.
Download the Converted File: Once satisfied, download the converted file.
And there you have it! You’ve successfully used the Converter Tool in MAPOG Map Analysis to convert your KML files to GML. Now you can easily convert your data for all your analysis needs, simplifying the process of handling different data formats and making your workflow more efficient and effective. For any queries, please contact us at support@mapog.com.
Here are some other blogs you might be interested in:
Convert KML to KMZ effortlessly with MAPOG. Streamline your geographic data transformation for enhanced spatial analysis and interoperability.
Transforming your GIS data by converting KML to KMZ can make it easier to analyze, share, and integrate into various GIS applications. In this guide, we’ll walk you through the process of efficiently converting your KML files to KMZ using the powerful Converter Tool in MAPOG Map Analysis. Whether you’re a beginner or an experienced user, this tutorial will help you understand the process in easy steps.
Key Concept of Converting GIS data Files
The Converter Tool in MAPOG Map Analysis helps you change your data from one format to another effortlessly. You input your data in one form, and it transforms it into another form that you need for your analysis. This versatility allows you to download and use data in various formats, making it adaptable for different applications.
Steps to Convert KML to KMZ
Step 1: Upload the Data
Access the Converter Tool: Click on the “Process Data” menu and choose the “Converter Tool” option.
Upload Your KML File: This is your starting point where you provide the data that needs conversion.
Step 2: Select the Format for Conversion
Choose the Output File Format: Select KMZ as the output file format. The tool offers various formats, but for this guide, we focus on converting to KMZ.
Set the CRS (Coordinate Reference System): You can also set the CRS at this stage to ensure your data aligns correctly with your spatial analysis requirements.
Step 3: Run the Conversion
Start the Conversion Process: Click ‘Convert’ and let the tool work its magic. The Converter Tool processes your data, transforming it from KML to KMZ format.
Step 4: Review and Download
Review the Converted Data: Check your converted KMZ data to ensure it looks right. This step is crucial to verify that the conversion has been successful and the data integrity is maintained.
Download the Converted File: Once satisfied, download the converted file.
And there you have it! You’ve successfully used the Converter Tool in MAPOG Map Analysis to convert your KML files to KMZ. Now you can easily convert your data for all your analysis needs, simplifying the process of handling different data formats and making your workflow more efficient and effective. For any queries, please contact us at support@mapog.com.
Here are some other blogs you might be interested in:
Convert KML to GeoJSON effortlessly with MAPOG. Streamline your geographic data transformation for enhanced spatial analysis and interoperability.
Transforming your GIS data by converting KML to GeoJSON can make it easier to analyze, share, and integrate into various GIS applications. In this guide, we’ll walk you through the process of efficiently converting your KML files to GeoJSON using the powerful Converter Tool in MAPOG Map Analysis. Whether you’re a beginner or an experienced user, this tutorial will help you understand the process in easy steps.
Key Concept of Converting GIS Data Files
The Converter Tool in MAPOG Map Analysis helps you change your data from one format to another effortlessly. You input your data in one form, and it transforms it into another form that you need for your analysis. This versatility allows you to download and use data in various formats, making it adaptable for different applications.
Steps to Convert KML to GeoJSON with MAPOG
STEP 1: UPLOAD THE DATA
Access the Converter Tool: Click on the “Process Data” menu and choose the “Converter Tool” option.
Upload Your KML File: This is your starting point where you provide the data that needs conversion.
STEP 2: SELECT THE FORMAT FOR CONVERSION
Choose the Output File Format: Select GeoJSON as the output file format. The tool offers various formats, but for this guide, we focus on converting to GeoJSON.
Set the CRS (Coordinate Reference System): You can also set the CRS at this stage to ensure your data aligns correctly with your spatial analysis requirements.
STEP 3: RUN THE CONVERSION
Start the Conversion Process: Click ‘Convert’ and let the tool work its magic. The Converter Tool processes your data, transforming it from KML to GeoJSON format.
STEP 4: REVIEW AND DOWNLOAD
Review the Converted Data: Check your converted GeoJSON data to ensure it looks right. This step is crucial to verify that the conversion has been successful and the data integrity is maintained.
Download the Converted File: Once satisfied, download the converted file.
And there you have it! You’ve successfully used the Converter Tool in MAPOG Map Analysis to convert your KML files to GeoJSON. Now you can easily convert your data for all your analysis needs, simplifying the process of handling different data formats and making your workflow more efficient and effective. For any queries, please contact us at support@mapog.com.
Here are some other blogs you might be interested in:
Effortlessly convert KML to MID with MAPOG to streamline your geographic data transformation for enhanced spatial analysis.
Transforming your GIS data by converting KML to MID can simplify analysis, sharing, and integration into various GIS applications. Whether you’re a beginner or an experienced user, this tutorial will guide you through the process in easy steps.
KEY CONCEPT OF CONVERTING FILES
The Converter Tool in MAPOG Map Analysis allows you to change your data from one format to another effortlessly. You input your data in one form, and it transforms it into the required format for your analysis. This versatility enables you to download and use data in various formats, making it adaptable for different applications.
STEPS TO CONVERT KML TO MID WITH MAPOG
STEP 1: UPLOAD THE DATA
Access the Converter Tool: Click on the “Process Data” menu and choose the “Converter Tool” option.
Upload KML File: This is your starting point where you provide the data that needs conversion.
STEP 2: SELECT THE FORMAT FOR CONVERSION
Choose the Output File Format: Select MID as the output file format. The tool offers various formats, but for this guide, we focus on converting to MID.
Set the CRS (Coordinate Reference System): You can also set the CRS at this stage to ensure your data aligns correctly with your spatial analysis requirements.
STEP 3: RUN THE CONVERSION
Start the Conversion Process: Click ‘Convert’ and let the tool work its magic. The Converter Tool processes your data, transforming it from KML to MID format.
STEP 4: REVIEW AND DOWNLOAD
Review the Converted Data: Check your converted MID data to ensure it looks correct. This step is crucial to verify that the conversion has been successful and the data integrity is maintained.
Download the Converted File: Once satisfied, download the converted file.
Conclusion
And there you have it! You’ve successfully used the Converter Tool in MAPOG Map Analysis to convert your KML files to MID. This conversion simplifies the process of handling different data formats and makes your workflow more efficient and effective. For any queries, please contact us at support@mapog.com.
Here are some other blogs you might be interested in:
Effortlessly convert KML to MIF with MAPOG to streamline your geographic data transformation for enhanced spatial analysis.
Transforming your GIS data by converting KML to MIF can simplify analysis, sharing, and integration into various GIS applications. Whether you’re a beginner or an experienced user, this tutorial will guide you through the process in easy steps.
Key Concept of Converting Files
The Converter Tool in MAPOG Map Analysis allows you to change your data from one format to another effortlessly. You input your data in one form, and it transforms it into the required format for your analysis. This versatility enables you to download and use data in various formats, making it adaptable for different applications.
Upload KML File: This is your starting point where you provide the data that needs conversion.
Step 2: Select the Format for Conversion
Choose the Output File Format: Select MIF as the output file format. The tool offers various formats, but for this guide, we focus on converting to MIF.
Start the Conversion Process: Click ‘Convert’ and let the tool work its magic. The Converter Tool processes your data, transforming it from KML to MIF format.
Step 4: Review and Download
Review the Converted Data: Check your converted MIF data to ensure it looks correct. This step is crucial to verify that the conversion has been successful and the data integrity is maintained.
And there you have it! You’ve successfully used the Converter Tool in MAPOG Map Analysis to convert your KML files to MIF. This conversion simplifies the process of handling different data formats and makes your workflow more efficient and effective. For any queries, please contact us at support@mapog.com.
Here are some other blogs you might be interested in: